Just a Simple Wrench
by Ann & Jake Snyder
 The First Time Was The Best
There were not a lot of expectations the first time, and no concern for problems. So when the doleful man behind the counter told us, "We don't have any paint codes for English cars. They're foreign. You will have to pick something out of the book", we simply selected the perfect shade of red, something close to what we would later recognize as Tartan Red, with a small leaning to Blaze. It was called Bahai Red, and it was a VW color. It remains the only VW part we have ever touched, and it lost its identity as a VW color after it was applied to our TD. We have always wondered why English cars were foreign, but German cars were not, but things were a lot different thirty years ago. The paint was acrylic lacquer, which has a lot of advantages when working in your own back yard under a temporary tent of 1-by-2's and plastic sheeting. It is relatively non-toxic, which made the dust mask we had reasonably safe, at least when essentially working in the open air. This was before institutions such as USEPA, NIOSH, OSHA and RLFNDR. Acrylic lacquer dries fast, which is a real advantage when removing those big runs that are called "sags", "lace" or "curtains", and if there is a difference, we are still confident we have seen them all. And we could spray acrylic lacquer with a small compressor with wheels from Sears and the paint gun that came with the compressor. This first time taught us a lot about painting technique and bad luck. Our bad luck was the humidity. We were painting in summer, and the air had so much water in it that the bright red lacquer was a blush pink. We finally had a break in the weather and managed to get a few coats that gave the proper hue, but the humidity or lack of sophistication in preparing the base paint resulted in a lot of paint chipping off after only two years.
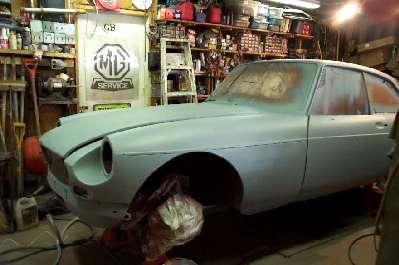
Everything is different now. We have expectations, and we know that not meeting them is a real possibility. And, this time, we had a time restraint. Winter was coming, and the rubber bumper GT had to be put away before the salt season. Unfortunately, we had spent too much time enjoying weekends this past summer. Both winter cars, our '71 roadster and our '72 GT, had too much missing metal due to advanced rust syndrome. This is a condition in which there is sometimes a question about the continued attachment of the springs and gearbox, and usually no question about the state of the floor panels, as the road surface is the next step down. One of us was allowed to buy his way out of trouble by acquiring a '73 GT in fine mechanical condition, but, as the seller noted, painting was in order. At first we thought we could put the painting off until spring, but the paint was very thick, and had cracked. Rust was visible in the bottoms of the cracks, and this meant the newly acquired GT would probably rust through very quickly, as there was no way to keep salt from collecting and accelerating the corrosion process. Spraying another coat of paint on top of cracks would have been a waste of time and expensive paint.
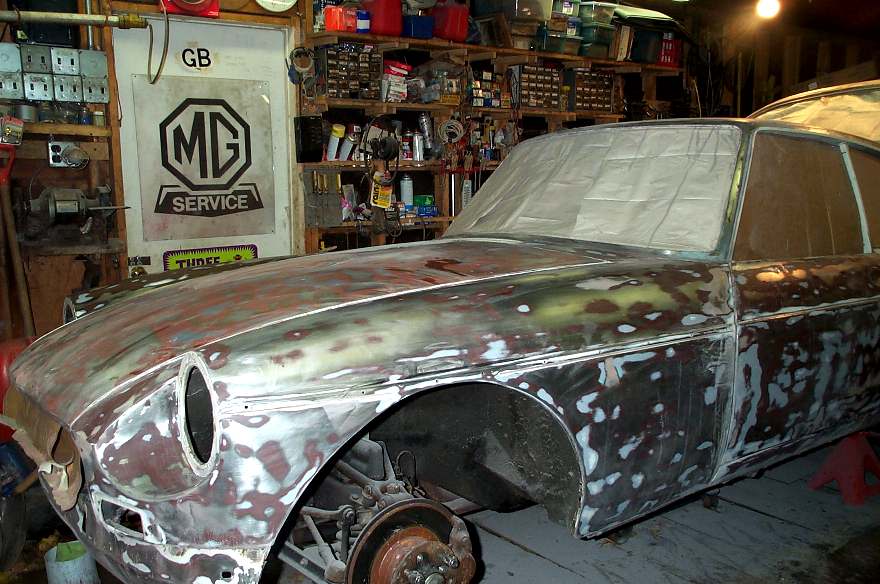
So the various layers of paint had to come off, and we reviewed the main processes that reading, attendance at Mr. Twist's University Motors Ltd. restoration course, and sad experience had taught us:
A.) Media blasting was out, because we did not have time to remove every part from the car and did not want the car to come back with "sand in all its things".
B.) Chemical stripping was out because we did not trust that we would get rid of all of the chemical residue, and the paint was Glacier White, which would show any staining very easily.
C.) Heating was out, because we did not know where or how much filler was under the paint. Replacing body filler would negate any advantage of quick stripping with a heat gun.
D.) That left sanding as the only remaining option. This is slow and dirty, but we chose this route as being the fastest and most reliable overall method of removing paint in our particular case.
We started the job by disconnecting the battery, lifting the car onto 6-ton jack stands, and removing the chrome, glass, lamps, rubber and wheels. We covered the interior and masked the window areas, either with screwed-on cardboard or pieces of a throw-away drop cloth held in place with caulking compound. A club member had told us to ground the body, and we did so with a wire from a body bolt to a long piece of welding filler rod stuck into the ground outside. Grounding is supposed to dispel mists faster, possibly by discharging static buildup.
We had the advantage of a large compressor and a random orbital sander. Starting with 100-grit, about 75% of the paint was taken down to either bare metal or body filler. The headlamp tunnels took about twenty seconds each with a flap wheel on a hand drill. We switched to 150-grit on the random orbital sander, and finished the machine work with 180-grit on a half-sheet electrical sander. Some light filling was necessary, and we wished we had the time before the cold winds came to spend a little more effort here. Elbow grease followed with 220-grit wet paper to feather everything.

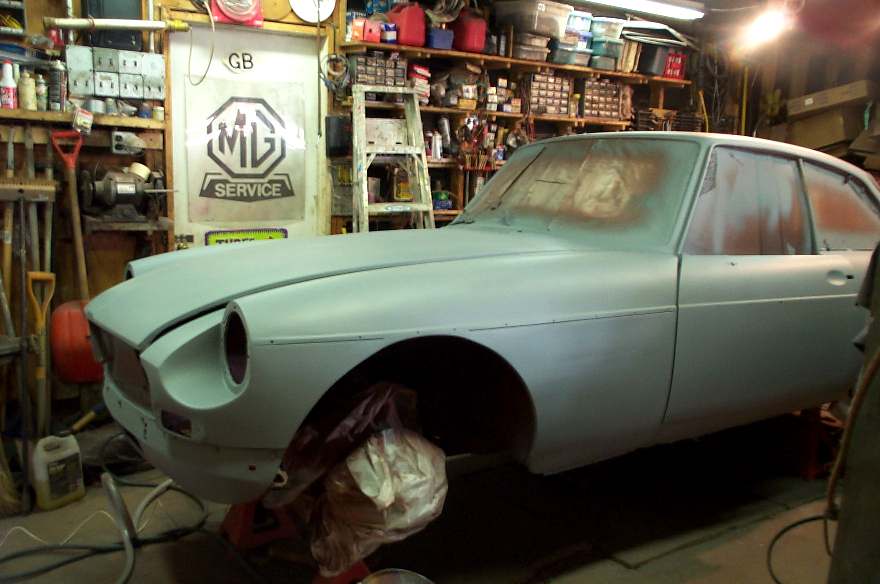
The paint schedule we planned used RasO'Nil (an etching primer and rust stopper that is not compatible with quick drying self-etching primer), epoxy two-part primer, red lacquer sanding primer, grey lacquer sanding primer, grey epoxy two-part primer, and catalyzed acrylic enamel as the Glacier White color coat. This paint is different, and highly superior to acrylic lacquer in that it is very durable. It is also very toxic. The real world intervened several places, but the doleful man behind the counter said the paint schedule would work and phoned factory support for confirmation. He was doleful because he said the weather was too cold to paint, and he was not the same doleful man who had helped us before. We had also downloaded a lot of information from the website for our paint brand, and had checked the many-paged list of paint failures that were waiting, although we think we stumbled on to one that was not on the trouble list.
The question of what safety gear we should use was easy to answer. Considering the extreme short-term and long-term toxicity of the primers and paint we were using, we checked our health plan brochure for our copayment under the heading of "Lung, Surgical Excision Of, Quantity One", and decided that the recommended safety gear was a lot less costly. We checked Eastwood as one source for the fresh air mask we needed. And of course we wore gloves, disposable vinyl covered with disposable nitrile. The vinyl provided mechanical strength, and the nitrile gave a little more chemical resistance, though cleaning up with lacquer thinner still required the chemical-proof neoprene gauntlets. We stopped the dripping sweat problem by wearing long sleeved shirts that were rubber-banded to the gloves at the cuffs.
We had two bad problems. The final epoxy primer had fisheyes in two places. We should have used the fisheye destroyer for this primer, but we did not know it at the time. We filled the fisheyes and added another coat of sealer, which is where we should have stopped. But we decided to shoot another coat of sealer, and this lifted some of the improperly dried first coat of sealer. We were getting a little doleful ourselves, at this point. We sanded out the wrinkles, and shot the first color coat. It was disastrous. The lighting wasn't nearly good enough for shooting white paint. Some fisheyes came back, even with the special additive to eliminate them. And we had "oyster gills" in two small places where the wrinkles in the second sealer coat had been sanded out. These were due to grey primer lifting on the edges where it had been feathered, and sticking up through the color coat. The next day, we sanded out the "oyster gills", and made several light passes with Duplicolor primer, heating each pass with the heat gun. Then we shot the second color coat, followed the next day with the third after rubbing lightly with a scratch pad to get rid of some of the orange peel. All the paint stayed on, lay flat and looked shiny.
We decided to finish the job by rubbing out some of the orange peel in the color coat because the next week's weather forecast was not too bad. We used wet paper in grits 800, 1000, 1500 and 2500, then polished using the big random orbital polisher one of us got the other as a gift for her birthday. The job would need some touching up. It looked too thin on the door panels, and there was a run in the primer on one door. But we were definitely out of time, so we replaced the rubber, glass, lamps, chrome and wheels and let the car down from the jack stands. We connected the battery and drove the car out onto the unraked autumn leaves.
It was not a perfect experience. But as we looked at the Glacier White GT in the sun, the earth moved. Again.