Carburetor Swap - March 31, 2001
Changing a single 1-3/4 inch Zenith-Stromberg
to twin 1-1/2 inch SU's
Page 2
Click on small pictures for BIGGER pictures (average 40K)
 |
 |
 |
 |
Tom Sotomayor will be doing most of the work, and gotta start somewhere, so yank the air cleaner. I wonder what he's going to do with that hot water choke? The help is really rolling in now, along with plenty of sidewalk supervisors.
|
 |
 |
 |
 |
Plenty of a**es and elbows here. How many can work under the bonnet at one time? Ah! Daylight where the Z-S carburetor and manifold used to be. Now if we just saw here, .... No no! Down there. Time to cut the down pipe to remove the catalytic converter (definitely the easy way out).
|
 |
 |
 |
 |
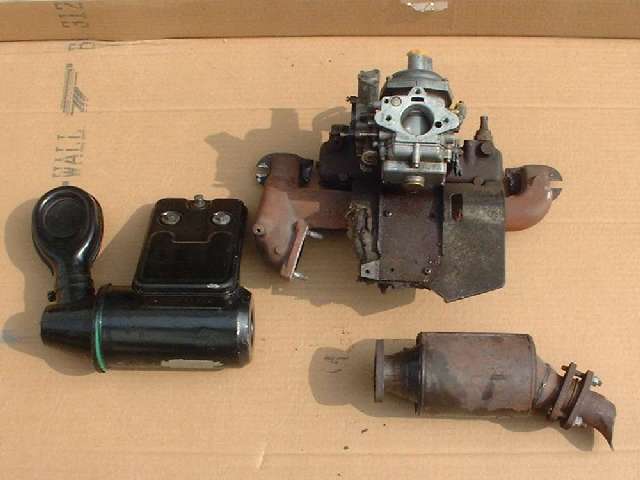
Major parts removed. Heat riser and air clrener assembly, Z-S carburetor and heat shield still on the intake/exhaust manifold, and the funky little catalytic converter with the cat litter rattling inside. Oops, that was supposed to be honeycomb catalyst in a past life.
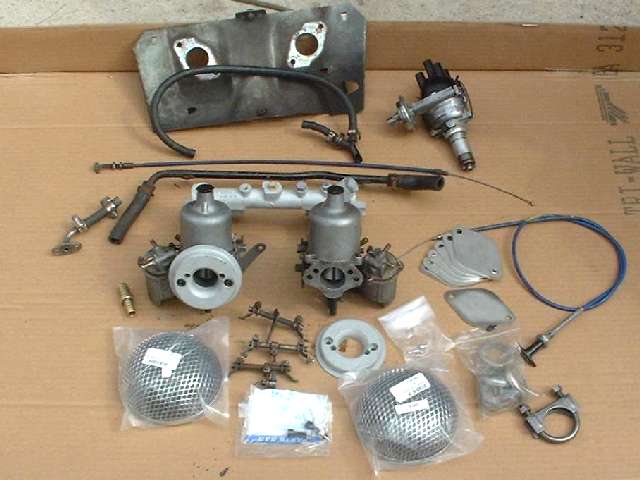
Parts to be installed are new cast iron exhaust manifold (not shown), aluminum intake manifold, heat shield, twin SU carburetors (HS4 type) with linkages, air cleaners and manual choke. The diamond shape plates are spacers for the left side engine mount. Oh, and don't forget the new distributor, because the vacuum advance requirements are different for the new carbs. There is one small part modification here. The base mounting rings from the factory dual air cleaners are use here, because it is desireable to have the radiused corner at the air throat entry for better air flow. Tom has counterbored the mounting holes in these rings and used socket head cap screws to make the heads fit flush with the front surface. This allow for a Unisyn air flow syncronizer to be used without removing the mounting rings. The time from air filters on, to ready to balance is under 20 seconds.
Now we need to get underneath to unbolt the engine mounts from the frame. Needing a little boost to the body to get the floor jack under that lowered suspension. Don't drop it yet, Cowboy. We have a few valuable hands under there (and bodies to match).
|
 |
 |
 |
 |
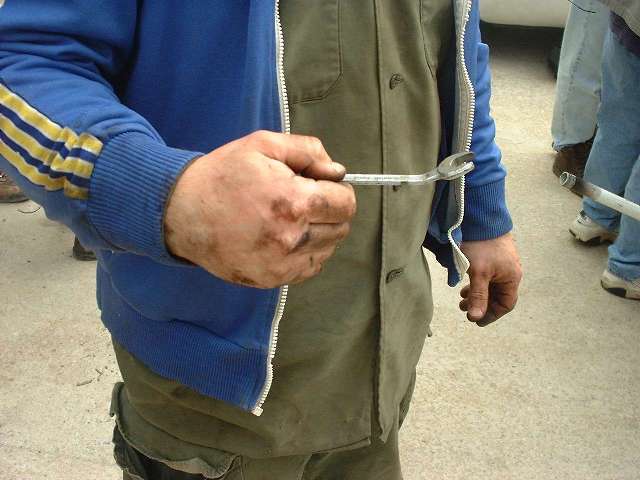
Now a little boost to the engine. A board might help here. Otherwise just don't put the jack under the center of the oil pan, or we'll have to R&R that as well to get the dents out. Notice Tom's special engine mount wrench to get past the steering column. You can go 1/6 turn at a time, but you can't turn the wrench over because of the bend. Now we have "Legs #1", the first of a long series. This should take about five minutes to remove one nut from the bottom of the left engine mount. Well, maybe a little longer. Who's got the Kroil?
|
 |
 |
 |
 |
Old and new engine mounts. This is quite common for the rubber bumper B's to fracture engine mounts. There's the space where the engine mount used to be. We only had to stretch the lower radiator hose a little get enough space to remove the mount. Then stretch it a little more to boost the engine enough to get the new mount into place. Needing a couple of shims for the left engine mount, Tom brings up his "laser cut" plate spacers. Easier to install these things if we slot the holes to drop the plates in from the side rather than boosting the engine for more clearance. Tom's tool of choice is the air powered cut-off wheel.
|
  
back - top - next
|

©2001 Chicagoland MG Club, All rights reserved.
|