
Chicagoland MG Club
General Tips
MGA Tips
MGB Tips
Midget Tips
MGT Tips
MMM Tips
Tech Session
Photo Archives
|
|

In-Line Fuses: The Five Dollar Insurance Policy
 If I told you that you could purchase an insurance policy that would protect your British sports car for as long as you owned it for around five dollars, you would probably ask me if I had a bridge to sell also! But, while I don't have a bridge, I can tell you how to protect your baby for under five bucks.
Most British sports cars manufactured before 1968 only have two fuses protecting their entire electrical system. Typically these fuses only protect the horns, A-2, the purple wires on the fuse block, and the accessories, A-4, the green wires on the fuse block. A fuse on the horns is handy to remove when the horn button sticks and your neighbors are threatening you, and your accessories such as the stop lights, turn signals and wipers are duly protected from staging their own version of the Chernoble melt-down. Some of the most important and largest current-using circuits are not protected from electrical problems and short circuits. The circuits that I'm referring to are (surprise!) the headlamps and side lights. These circuits are in constant use, unlike all the others that enjoy only intermittent use. A worthwhile modification to pre-1969 British sports cars is to fit fuses to these unprotected circuits. This will protect the car's wiring system from damage and the whole automobile from a possible fire!
When an unfused circuit, like that of the headlamp, develops a short circuit, the wires will get red hot and burn away their plastic insulation. Should these bare wires contact anything combustible, such as interior material, grease or gasoline, you can guess the resultsyou do carry a fire extinguisher, don't you?
An easy way to protect yourself and your British baby is to fit what is known as an "in-line fuse". An in-line fuse is a small plastic holder containing a replaceable standard automotive fuse for attachment in a circuit.
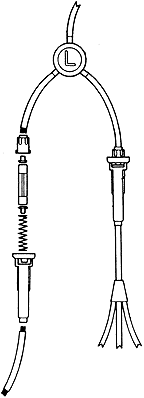
These little wonders are placed usually between the switch and the electrical device in the wiring. For example, on the headlamp circuit, put the fuse between the headlamp switch and the dipper switch, and for the marker lights, between the switch and the group of red wires. Or, a single fuse can be placed between the headlamp switch and its source of power on cars with separate ignition and headlamp switches. Personally, I prefer to protect each circuit with its own fuse. (See diagram.)
The wonderful thing about in-line fuses is that they can be easily installed, and also, easily hidden for Concours fans. If a problem arises in that circuit, the fuse will blow, stopping any further damage. You'll also know that the problem is limited to just that circuit, not the whole car, when it comes time to trouble-shoot the problem. Moss stocks these units under part #146-750. Use a 25 amp. fuse, #146-710, for most circuits, or a 35 amp. fuse #146-700, if you are using Quartz Halogen headlamps.
To install an in-line fuse, first consult your shop manual for the wiring diagram to find how the circuit is wired and the color code of wires in question. Next, disconnect the battery, otherwise you will be cutting into a "live" wire, and while there isn't enough voltage to hurt you, you want to avoid any short circuits while you install the in-line fuse. Be sure to solder or use the proper type of connectors when joining wires together; just twisting them together and slapping some tape around them creates problems instead of preventing them.
Often, you can simply cut the existing wire from the switch and install the in-line fuse in the middle of the wire, leaving enough distance from the switch so you don't have to stand on your head to change the fuse.
If the wire isn't long enough to handle easily, you may extend the wire using additional wire of matching size and approximate color. Installation is as follows: Cut the wire in a handy location between the light and its on-off switch, then remove about 3/16" of the insulation from each end. On one end, slide on the plastic cap, followed by one of the metal contacts, which you will solder to the end of the wire.
On the other loose end of the wire, slide on the longer plastic tube, followed by the spring and the other contact that you will solder in place. Insert the fuse in the longer tube and screw the cap in place by pressing down and turning it about a quarter turn and the job is done! It's also a good idea to mark the outside of the fuse holder with a felt-tipped pen so you can tell the circuits apart. At $1.55 each, you can afford to protect all the unfused circuits in your car and ultimately your car itself!
e, and rectangular in shape originally designed to moisten labels and envelopes. It's called the Sterling Master Moistener and works just great!
Back to General Tech Tips
|
|

