|
 In this project I had these objectives: made from readily available materials, fabricated with minimal tools ľ mostly hand tools, minimum cost while retaining quality and strength. Note that this discussion is aimed at installation in an MGB. It can be altered to fit other cars with a little creativity of your own. In this project I had these objectives: made from readily available materials, fabricated with minimal tools ľ mostly hand tools, minimum cost while retaining quality and strength. Note that this discussion is aimed at installation in an MGB. It can be altered to fit other cars with a little creativity of your own.
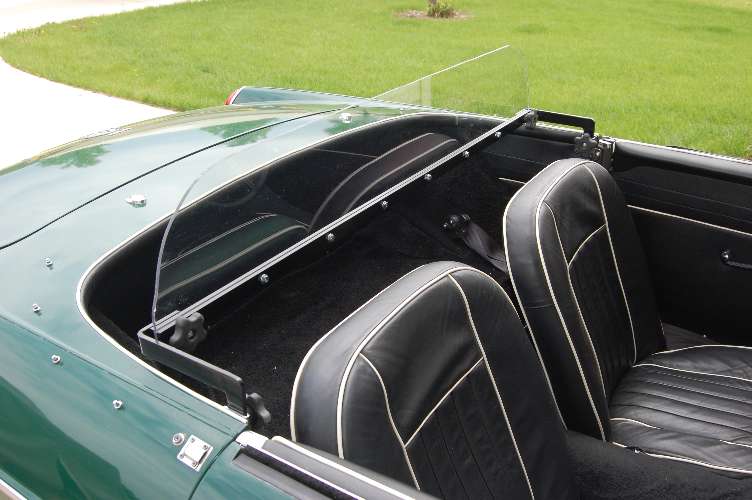
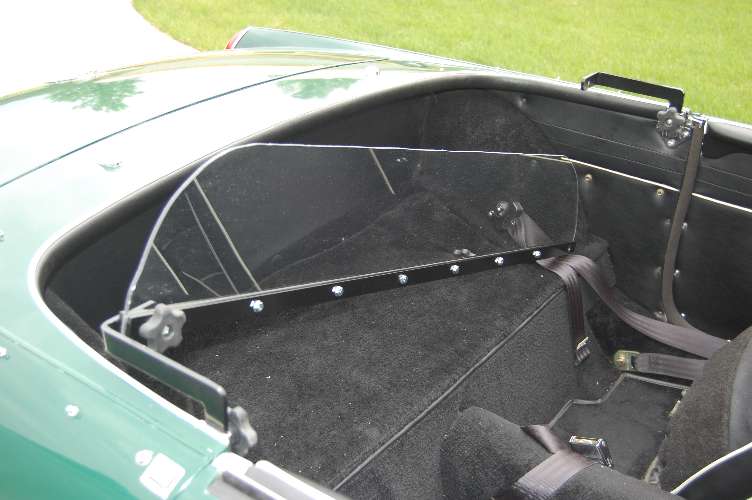
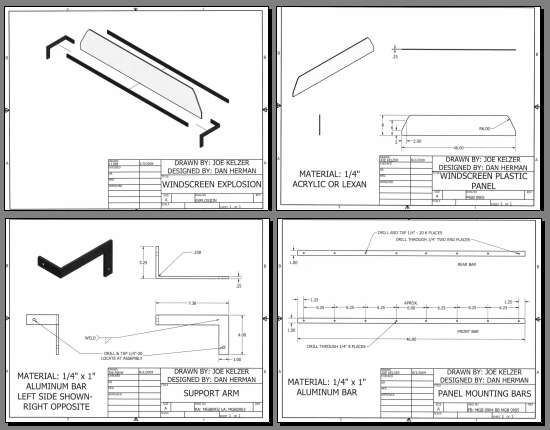
After considering several alternatives in material and design I settled on aluminum bar stock for light weight and corrosion resistance. There are three basic components to this design; the clear panel that is the actual baffle to block the air circulation, the reinforcement bars to hold the panel and the mounting arms that secure the panel assembly to the hood mounting brackets.
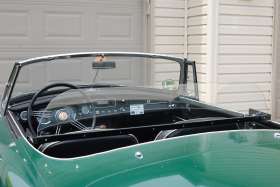 The panel. The commercial product is described as using acrylic plastic as the panel. An alternative is polycarbonate (Lexan) that is more durable, scratch resistant and more expensive. I chose to over-design and go with the Lexan. For the MGB the panel is approximately 47 inches long and 8 inches tall. You could leave it rectangular, but it is less hazardous and better looking to cut the upper corners with a broad radius. The accompanying dimensioned photograph shows how I cut mine. You can use other dimensions, just lay out what looks good to you. The panel can be obtained from a glass shop. Make a pattern from corrugated paperboard. You can use it to mock up your installation and make sure it fits correctly and then not rely on the glass shop to lay it out correctly from a drawing. Just hand them the pattern and ask them to: ômake it like thatö.
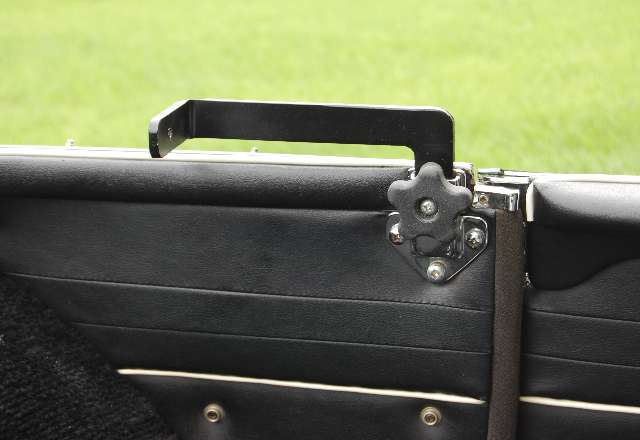
The reinforcement bars. The major hardware stores and the big box guys like Menards have aluminum bar stock thatĺs one quarter inch thick and one inch wide. Make a sandwich of two of these bars gripping the bottom edge of the panel. See the photo. I settled on eight bolt locations and determined equal spacing between the holes. Here is another point of choice. I designated one bar as the rear piece and drilled and tapped the holes to ╝ -20. There is adequate strength to tighten the bolts securely and it makes a cleaner installation with bolts selected to emerge flush with the rear surface of the bar (1/4 X 1). An exception to this is the end fasteners. Here you drill to ╝ through both bars and install the tapped hole in the mounting arm. The end bolts then complete the clamping of the panel and function as the securement to the arms as well. Alternatively, you may choose to drill through all pieces and use nuts on the clamp and assembly bolts.
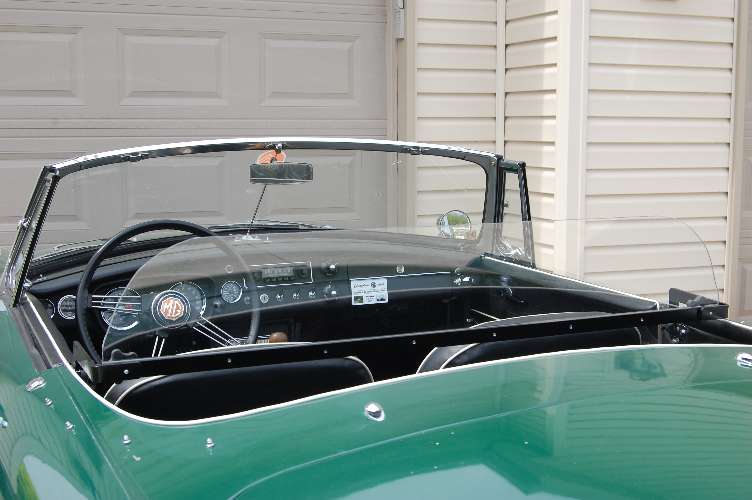
The mounting arms. These pieces support the panel assembly by joining it to the hood and/or tonneau bar mounting brackets on the rear cabin side panel. They are fabricated from the same bar stock as used in the panel assembly. First you machine the tab that engages the bracket. Cut two blanks to 3 ż inches length. The socket in the bracket is tapered along the length of the short dimension. That is the opening is ╝ inch wide at the top and about 3/16 inch at the bottom. Not much difference, but enough to prevent inserting the tab in the full length of the socket. Machine the lower end of the tab with a file, disc or belt sander or whatever suits your available tools. Use trial and error to fit the tab to the socket. The photograph illustrates the taper. You will also need to clip or round the bottom corners of the tab to fit the contours of the socket. Insert the completed tab in the bracket and mark the location of the ╝ inch hole on the tab. Drill and tap ╝ - 20 at this location for insertion of a bolt or knob screw to secure the tab/arm in the socket.
Next, cut two blanks from the bar stock, for use in making the mounting arms, to 10 inches in length. This is longer than needed for the finished part as the segments will be trimmed to the necessary length after the arm is bent. Grip the blank in a vise with 2 Ż inches protruding above the jaws. Making sure the blank is perpendicular to the jaws bend it over to 90 degrees. A heavy hammer helps. This material is soft and can be bent to this angle without fracturing. Now you are faced with a decision; to weld the bent arm to the tab or to bolt them together. I chose welding (butt joint) to produce a smoother piece that, when painted, looks like it were stamped from one piece of material. If you want to avoid hunting down a welder and that additional cost you can overlap the two pieces and bolt them together. If you choose a weldment the long leg of the arm should be trimmed to nine inches, with a bolted joint it should be ten inches.

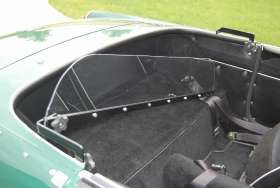
Install the completed arms in the brackets, clamp the panel assembly to the short legs of the arms in a centered position and mark the location of the panel end holes on the arms. Drill and tap this location to ╝ - 20 to provide attachment of the panel to the arms. The short legs of the arms may not be level because of slant in the installation of the hood brackets. If necessary, bend the arms/tabs to level the short legs. The assembly can be secured with standard bolts, but using knob screws as shown in the photos enables installation without tools. Painting the metal components is your choice.
The completed device can be installed easily using this sequence: Install the mounting arms in both hood brackets. Carefully insert the panel assembly into the rear cargo/fold-away top compartment and attach the near end to the support arm. Cross to the other side, lift the end of the panel and install the clamp bolt.
Bill of material:
Lexan panel, 8ö X 46ö
Acrylic panel
3 pieces 1/4ö X 1ö X 48ö aluminum bar
Clamp knobs 4 X $2.50
Sales tax (Lexan)
Total (Lexan)
Total (acrylic)
Welding option add
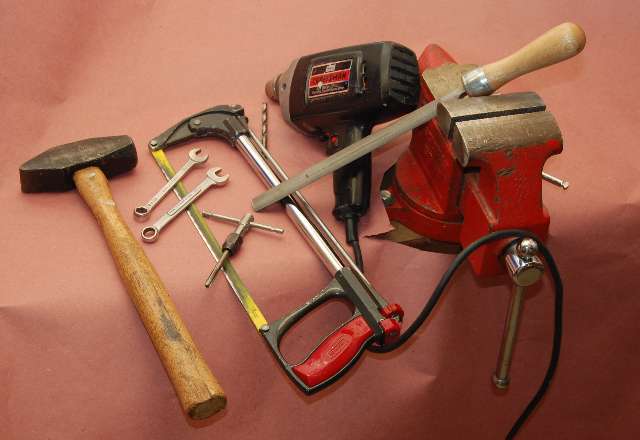
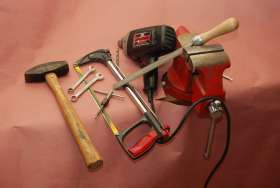
Tools:
Bench vise - Drill motor and bits - Hacksaw - Hammer - 1/4öľ20 tap - File
|
$42
$28
$42
$10
$6.50
$100
$86
~$15
|
|
Met the objectives; cost about half that of commercial version, found material at local stores, fabricated with common tools. Thatĺs it. Enjoy quieter MG motoring!
Click for 659-KB PDF file containing the four drawings below.
Back to MGB Tech Tips
|