The MGA With An Attitude
IGNITION TROUBLE SHOOTING - IG-106
There is an old adage saying, "90% of all carburetor problems are electrical". To save time and unnecessary worries, if the engine is not running, or is misfiring, check out the ignition system before fiddling with the carburetors. Most of this article should fall under General Knowledge or Universal Tech, but the Workshop Manual was written for at least a minimally experienced mechanic. Since I get a lot of questions about spark problems, this bears posting for the benefit of average Joe, the home DIY mechanic.
At 08:26 AM 7/27/05 -0500, Dan Albrech wrote:
"Car will not start. I've sprayed starting fluid in the carbs and tried putting fuel in the throats still nothing."
Spark problem.
"It appears to be a weak spark and doesn't seem to be 100% consistent. Seems to miss a few times. Ed from Just Brits seems to think I have a weak ground to the coil."
This is likely a misinterpretation. The coil does not need to be grounded, at least not on the case. It will work with only two small wires and the HT lead hooked up, even if you hold it in your hand not touching the chassis. The circuit requires power from the ignition switch, ground return on the other small wire through the contact points in the distributor, and the HT lead going to the spark plug through the distributor cap and rotor.
When the points open to disconnect the ground connection you get instant spark. The condenser serves to enhance the spark by greatly increasing the voltage to the input of the coil. It does this through a sudden electrical surge and a high frequency ringing effect, bringing the voltage as high as 300 volts for input to the coil immediately after the points break. See Ignition coil function and testing.
Disconnect the small wire on the side of the distributor. Connect an ohm meter between that terminal and the engine block. With points open you should have 50 mega-ohm resistance, or open circuit. With points closed you should read resistance no more than 1/4 ohm (250 milli-ohm max). If you do have this good ground connection through the points, then you may have a bad condenser. Weak spark is often the result of a bad condenser (and it's a cheap part to replace). If you see higher resistance here, then you need to clean and check the connections and the circuit path to ground through the points. Start by checking resistance across the contact points. Clean the points if necessary. Also check resistance between the distributor body and the engine block. Clean the clamp plate and underlying surface on the iron mount if necessary.
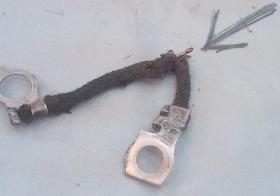
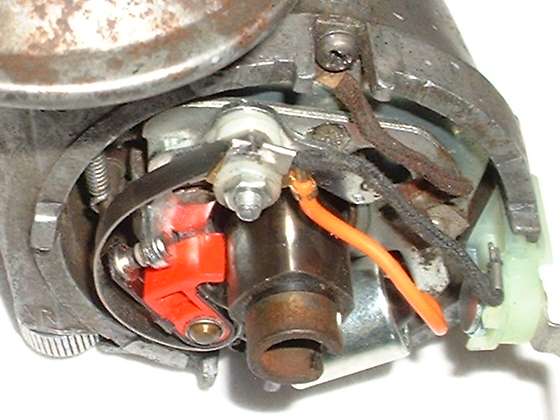
There are two small flex wires inside the distributor. One goes from the side terminal to the points. The other goes from the moving vacuum advance plate to the body of the dizzy. This second wire may be underneath the moving plate where you cannot see it until you remove the plate.
 If the first wire is broken inside the insulation, you may lose spark completely when the vacuum advance plate moves with variations in throttle setting. If the second wire is broken inside the insulation, you may have intermittent ground when the vacuum advance plate moves, and therefore intermittent spark. Without the second wire the ground path has to go through the center bushing of the moving plate, which is not a reliable ground contact. To check these flex wires connect an ohm meter or test light from the side terminal to the body of the distributor when points are closed. Apply vacuum to the vacuum advance unit to make it rotate the breaker plate through full motion (usually 7 to 10 degrees). If the test light or ohm meter will flicker or lose connection, one of the flex wires may be broken inside the insulation. If the breaker plate doesn't move the vacuum unit may be leaking, in which case it must be replaced.

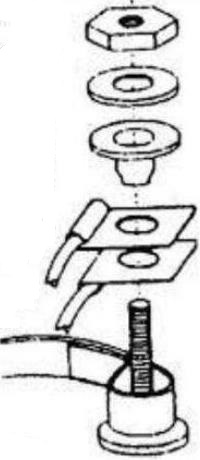
Input wire and condenser wire connect to spring arm, isolated from post.
|


The next item is a "kick yourself" thing if you get it wrong. When replacing contact points and/or condenser, connections of the condenser lead and the input flex wire have to be made to the spring arm of the points set, and these wires must not be grounded on the screw post. If the points open, but the side terminal is still grounded, you likely have this wrong. Correct assembly order is, bottom insulator bushing, condenser wire end terminal, spring arm, input flex wire end terminal, top insulator bushing, flat washer and hex nut. As a matter of convenience you can put both input wire and condenser wire terminals in front of the spring arm (under the insulating grommet), all electrically connected and all isolated from the post. These wires should be positioned so they do not touch or rub on the rotor shaft or housing in operation. Some replacement points sets may have a nylon screw post to avoid grounding on the post, and/or may have a flat insulating washer on the bottom rather than a second stepped bushing. In any case you still have to get the wires into contact with the spring arm and isolated from the metal post. I personally dislike the nylon screw post as it is tough to get it tight without breaking (and it can become brittle with age and heat cycling).
When you get this right the input terminal on the side of the distributor will have a short to ground when the points are closed, and open circuit when the points are open. Spark should jump about 1/4 inch in open air, and blue spark is better than orange. Pull a plug connector and put it on the tip end of a screwdriver with plastic or wooden handle. With ignition switched on, hold the shank of the screwdriver near the cylinder head and crank the engine. If you have a weak spark that only jumps a short gap, you might try changing the condenser first (cheap part). If that doesn't get you a hot spark, the coil may be on its last legs.
Caution: Do not lose the special screws for the distributor. The ones holding the breaker plate and condenser are BA4 (close to #6-38). The one holding the contact points set is BA2 (close to #10-31). You will not find these at your local hardware store.
The coil may get warm when running, but if it gets scorching hot to the touch it's likely going bad in a hurry. The MGA ignition coil should have about 3.3 ohms resistance between the primary terminals, or slightly lower (maybe 2.7 ohms) for a high output coil (3 ohms +/-10%). If you find about 1.6 ohms resistance, you have the wrong coil. The low resistance coil is intended for use with a ballasted ignition system (ignition resistor), which the MGA does not have. Such low resistance would make the coil draw about double the normal current, which will cause it to run hot and possibly burn out, and/or may burn the contact points or melt the rubbing foot when running. Leaving the ignition switched on with engine not running (and points closed) for long periods of time may also burn out a coil.
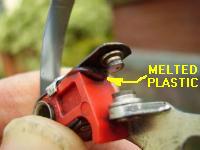
 One of the side effects of low coil resistance and high current is possible over heating of the contact points. This high current can burn contact points or melt the plastic rubbing foot on the contact points. Original contact points probably had a phenolic rubbing block which was very durable and heat resistant. Replacement points often have a plastic rubbing foot that may wear faster and may be susceptible to melting with excess heat. As the rubbing foot wears the points gap diminishes. As the plastic melts the points gap may go smaller or larger (usually smaller) depending on where it is melting. After readjusting a few times it may run out of adjustment range. If you cannot open the points wide enough, in a pinch you can grind out the end of the slot or use a heavy side cutter to clip away the metal to elongate the slot for more adjustment range.
If the engine seems to be running on less than all four cylinders you can pull plug wires one at a time. Disconnecting a plug wire should cause the engine to stumble and run badly (or even quit). If you disconnect a plug wire and it makes no difference to running, that's a bad cylinder. Try switching spark plugs with a good cylinder. If the problem changes to another cylinder along with the spark plug, it's a bad plug. Failing that you can try switching plug wires. If the problem changes to another cylinder along with the plug wire, it's a bad wire.
If switching plugs and wires doesn't solve the mystery, it's time to do a compression check. Compression reading less than 100 PSI at cranking speed can cause a misfire. If you find one cylinder low on compression, remove the valve cover and check valve clearances. If one rocker arm has no clearance the valve may not be closing. This could be a result of valve recession caused by wear on the valve seat or valve head. If re-adjusting the valve clearance fixes the compression problem you may be okay, but check on it again periodically to see if the gap diminishes with accumulated mileage. If the valves are closing properly and have correct rocker clearance, but it still has low compression, then you need to do a blow down test to see where it's leaking compression.
When compression looks good on all cylinders, and you have ruled out plugs and wires, and it still misses on one cylinder, then you should suspect a bad distributor cap. Look inside the cap for any signs of cracks or "tracking" (thin lines on the inside surface between terminals as traces of arcing). Check circuit resistance of each high tension wire and cap terminal with an ohm meter. Resistance from the terminal post inside the cap to the plug terminal end should be near zero ohms for solid core wires. Carbon core wires (resistance wire) should have resistance of about 5000 to 6000 ohms per foot. If you get 20,000 ohms in one wire it's a bad wire or bad end connections. Resistor type plug connectors might have a few thousand ohms resistance, and I would prefer to never use them.
Resistor type spark plugs may have 3000 to 4000 ohms resistance from the end connector to the center electrode. If you find more than 10,000 ohms resistance in the spark plug, see how far you can throw it. In recent years I have found Champion brand resistor plugs in particular to have a high failure rate (sometimes as bad as 10% of the parts), showing as high as 30,000 ohms when new. Original equipment for the MGA used no resistor parts in the high tension circuits. The resistor wires or plugs or plug connectors are used for suppression of radio frequency noise which may interfere with radio reception (static on your radio speaker).
If you get more than 1/4 ohm resistance on the terminal post itself from inside to outside of the distributor cap, it's a corroded terminal. Original issue distributor caps had copper terminal posts and would last a long time. Many newer replacement caps have aluminum terminal posts. The aluminum terminals will suffer surface corrosion over time as a direct effect of normal spark transmission. The aluminum surface gradually turns into aluminum oxide, which is an insulator. If the ohm meter shows very high resistance on the terminal surface (or no connection), you need to replace the cap. A sure telltale sign of this problem is high resistance on the face of the terminal (facing the rotor) and near zero resistance on the side or back surfaces of the terminal.
Check the center contact in the distributor cap, which is a spring loaded carbon button. This should depress and spring back easily with the touch of a finger. If not, or if the center contact is missing, replace the cap.
Check the rotor for corrosion. Checking with an ohm meter, resistance from the center contact point to the outer tip should be near zero ohms. If it has high resistance you might try filing the tip a bit for an emergency repair. Otherwise replace the rotor. The rotor may also develop a crack in the plastic. If there is a hairline crack the spark may be lost from the top of the rotor through the crack to the shaft, and on to ground through the base of the distributor. Such a crack may at times be virtually invisible, so switching rotors may be the only reliable check.
If the engine is running badly, and you can hear a sharp snapping or crackling noise, you might suspect that a spark is arcing somewhere. If this is not readily apparent in daylight you might look again at night or in a dark garage. If you see sparks arcing across the top of the distributor cap you may have a bad cap, or it could have bad rubber boots on the high tension wires. If you see sparks arcing across the end of the coil you might have a crack in the coil tower, but it's more likely to be a bad rubber boot on the high tension wire. If you see sparks arcing from a plug wire to another wire or to any ground point, it's likely a bad wire with broken insulation. If you see sparks arcing down the side of a spark plug it's probably a bad plug. The original type spark plug connectors on the MGA didn't even have rubber boots.
When you have a nice strong spark with all four plug wires, and it's still running bad, you might check the ignition timing. If you have strong spark but misfire on #1 and #2, the front carburetor may be fuel starved (or maybe flooded). With misfire on #3 and #4, the rear carburetor may be fuel starved (or maybe flooded). A flooding situation may show up as very wet spark plugs. With misfire on #2 and #3 you may have a blown head gasket between the cylinders, which would show up as very low pressure on #2 and #3 with the compression test.
|


