The MGA With An Attitude
Octagonal Wrench(s) for Rear Hub Nut, page-2 -- TS-106A
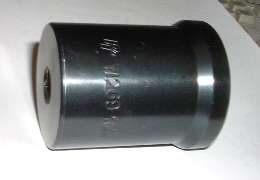 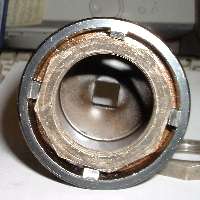
The black tool shown immediately above is a 1/2" drive forged steel socket intended to be used on the front drive hubs of some small trucks and sport utility vehicles. It has four square drive keys inside which will catch 4 sides of the 8 sided nut (shown on the right). This appears to be a little loose and not an ideal fit, but because it is a strong forged steel part it seems to work quite well. It works like a flank drive socket, bearing on the flat sides of the nut a little away from the sharp corners. A club friend has recently used this socket with an air impact wrench to R & R
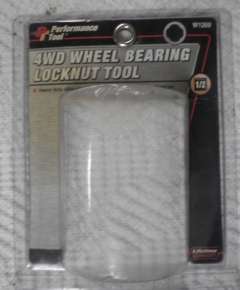 a couple of these hub nuts. Perhaps one of the best features is a price as low as $12-USD at a local auto parts store. Markings on the socket are "PT" W1269 CR-V Taiwan (by Performance Tool) for Ford F150, F250, F350, Bronco, Ranger, Explorer with manual hubs 1995 and later.
The part number W-1269 lead to O'Reilly Auto Parts for $9.99.
Here's a link to a similar tool (maybe the same one)
Ampro Wheel Bearing Locknut Tool T72044
Sold by Advance Auto Parts.
See listing on the Ampro web site.
Available from Amazon
Sometimes on eBay -
http://www.ebay.com/sch/i.html?_trksid=p2047675.m570.l1313&_nkw=AMPRO+T72044
At 11:03 PM 10/30/05 -0500, Mike L wrote:
"I had assembled my 1600 axle with a 3/4 drive Churchill tool to probably near 200 ft lb. When I needed to take it apart the Churchill loaner had already been returned. With a little bit of struggle (propane heat) the $10 socket undid the nut without damage. Surprisingly very effective, only wish I had a 3/4 to 1/2 adapter to put my 3/4 johnson bar to it."
|
Another manufacturer and part number, OTC socket #7157. This one does not seem to fare so well, apparently due to being fabricated from soft steel (not hardened).
 On 06 Jan 2009 Mike Ellsmore in Australia wrote: On 06 Jan 2009 Mike Ellsmore in Australia wrote:
"The new socket was useless - it just burred the drive dogs and slipped off the nut first try (see photo). No matter how many more times I tried I could not budge the nut. .... While the OTC socket is 1 61/64" between the drive dogs it is not meant for this job (made to fit in slots in Bronco hubs, etc). It is a fabricated part (the Ampro brand may be forged but the OTC is not) and the dogs don't appear to be hardened, and it is hard to keep aligned and exert the required torque. I would not recommend this tool for MGA rear hub nuts!"
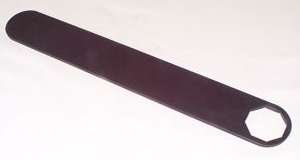 This flat wrench recently appeared on eBay with opening bid of only $4.99. I'm just a little skeptical about this one, because the octagonal nut is recessed slightly inside of the hub. For this tool to work I'm sure that at the very least you would have to push the hub inward toward the brake backing plate to allow the large nut to be exposed for a clear grip. Since the wheel bearing is supposed to be a very snug fit inside the rotating hub (at least a light press fit), the difficulty of having to push the hub back on the bearing leaves me wondering about the setback distance and possible seal damage. I had a short correspondence with the seller who insists that it works well (some satisfied customers as well as his own use). If anyone should happen to try one of these tools, please send me a short review.
At 09:46 AM 3/1/2008 -0700, Guy Vincent wrote:
"I found that a 12 Point 48MM Socket hammered on (A Very Tight Fit) will work great for removing and replacing the 1 61/64" Hub Nut.
|
On 07 July 2009, Art Pearsen in Ontario, Canada, wrote:

 "It is not so difficult to fabricate an octagonal spanner from 1/8 mild steel, using hacksaw, drill and file. About an hour's work. Make the handle about 12" long and tighten it with a 1 lb hammer. If you are careful you can get an exact fit. "It is not so difficult to fabricate an octagonal spanner from 1/8 mild steel, using hacksaw, drill and file. About an hour's work. Make the handle about 12" long and tighten it with a 1 lb hammer. If you are careful you can get an exact fit.
 Mark it out as best you can first using a scratch tool. Cut/drill/file undersize and gradually file it to final, offering it up to the nut frequently, until it fits. I actually made it in 2 parts of 2" wide stock, welded the two together. That way, I could use the hack saw for most of the waste. Vernier calipers will help a lot. Keep filing wider until the cut out reaches the nut width". Mark it out as best you can first using a scratch tool. Cut/drill/file undersize and gradually file it to final, offering it up to the nut frequently, until it fits. I actually made it in 2 parts of 2" wide stock, welded the two together. That way, I could use the hack saw for most of the waste. Vernier calipers will help a lot. Keep filing wider until the cut out reaches the nut width".
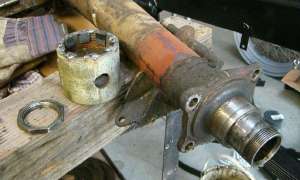
Here's a bloke who got creative and made his own octagonal socket. The photo should be self-explanatory. Kudos to Garon Curtis in Fair Oaks, California.
|
|
On 9/5/2012, Andrew Murdoch in Australia wrote:
"decided to send photo of a spanner that I had made for that pita nut.
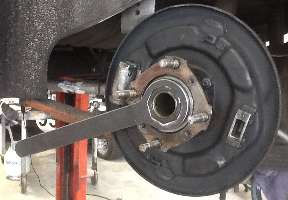 This one is very nice quality. The material is 7-mm (0.28-in) hot rolled steel. It was laser cut for clean precision. On close look at the larger picture you may notice the OD of the big end of the wrench is slightly smaller than the ID of the bearing hub. For disc wheel hubs remove the outer race spacer ring (which the wire wheel hub does not use). Then the wrench end fits at a slight angle inside the hub to get a good purchase on the thin nut. No offset is required for the wrench, and the hub housing does not need to be pushed back on the bearing race. The hub and outer bearing race will rotate as you turn the wrench.
 Addendum. July 2013
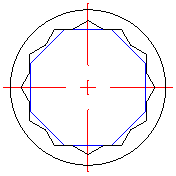
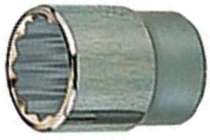
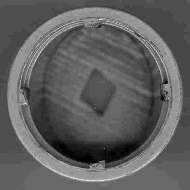
For those thinking of buying a "standard" socket off the shelf, a 50-mm 8-sided socket would be 0.4-mm (0.015-in) oversize and should work. A 50-mm 12-point socket can catch 4 corners of the octagonal nut and will be (nominally) 0.015-in oversize (should also work). Image at right is a CAD drawing of this arrangement. Click for larger image.
On February 04, 2014, Denis Nalepa in Red Bank, NJ, USA wrote:
"Welded some steel flat bar around an old 1 X 3/4 socket adapter 1 61/64 diameter. Hose clamp gives a little more grip. Worked better than a big adjustable wrench".
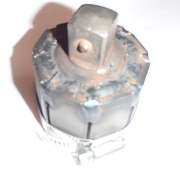
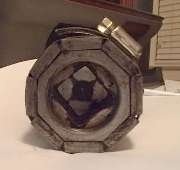
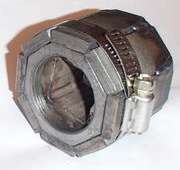
On 4/12/2015, Alan Wiedie wrote:
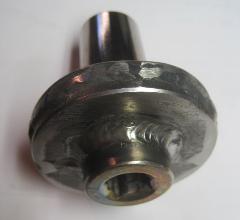
"Here is a 'special tool' I made for removing and installing the rear axle nut. It is made from a 7/8" x 1/2" drive deep socket, and some steel plates. I had some pieces of 1/4" x 1 1/2" steel bar available, so I cut two pieces, each with half the octagon shape to fit the axle nut, welded them together for the complete octagon, and cut this assembly to 2 5/8" diameter. This was welded around the edge to another 1/4" steel plate, 2 5/8" in diameter. I drilled a hole in the center of this plate for the socket, and welded the socket to the plate. The deep socket fits inside the axle tube, acting as a pilot, and a torque wrench can be used for installation. If I had it to do over, I would use 3/8" plate for the octagon socket piece to allow for more grip on the nut in case the axle tube protrudes beyond the face of the nut".
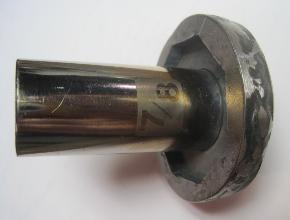
On 12/1/2015 Graham Smith in Melbourne. Australia wrote:
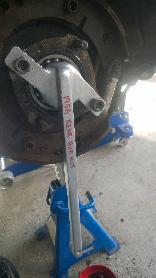
"I remove and replaced hub nuts using the tool shown in the attached photograph. The tool is robust and will remove the most stubborn nut.
The 'socket' head is made using eight steel segments progressively clamped and mig welded around a spare nut. It is only deep enough to cover the nut. A tight fit can be achieved. The steel top is welded on together with the arms that fit onto the hub studs which are used to keep the socket snug with the nut. A coating of bronze has been applied to the outer casing for added strength. The hub turns as the nut is undone. The stud nuts need to be slackened off as the nut is undone. A blow on the handle with a dead-blow hammer is helpful.
To remove the hub, we use a 5mm steel plate fixed across diagonal studs on the hub and a slide hammer screwed into the centre of the plate.
|


 This flat wrench recently appeared on eBay with opening bid of only $4.99. I'm just a little skeptical about this one, because the octagonal nut is recessed slightly inside of the hub. For this tool to work I'm sure that at the very least you would have to push the hub inward toward the brake backing plate to allow the large nut to be exposed for a clear grip. Since the wheel bearing is supposed to be a very snug fit inside the rotating hub (at least a light press fit), the difficulty of having to push the hub back on the bearing leaves me wondering about the setback distance and possible seal damage. I had a short correspondence with the seller who insists that it works well (some satisfied customers as well as his own use). If anyone should happen to try one of these tools, please send me a short review.


 Addendum. July 2013


