 Steering Rack Boots Steering Rack Boots
Like so many mechanical parts, rack-and-pinion steering requires two things to work efficiently: The presence of oil and the absence of water and dirt. Given these two conditions, a steering assembly should last hundreds of thousands of miles.
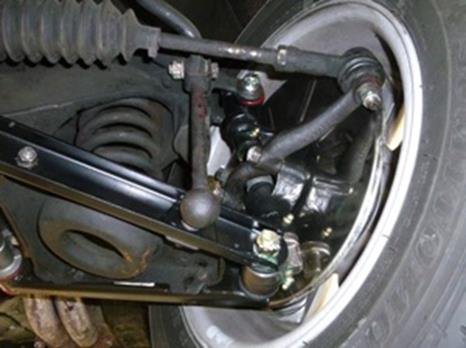
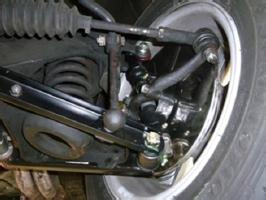
However, periodic attention is necessary to a very vital part of the steering: the rack boots (or seals, or bellows, or gaiters, or whatever you call those collapsible rubber things on each end of the rack). If these are split and leaking oil, the life of the rack-and-pinion is diminished every time you drive the car, especially if you drive on wet or dusty roads.
While the boots themselves are relatively inexpensive, many owners put off replacing the bad ones because a) it is a dirty job, and b) they know it will upset their steering alignment. The simple answers to these objections are a) but someone has to do it, and b) not necessarily. If your alignment is correct and your steering wheel is centered (see tech tip in the next column on this page), following the procedure outlined below will get you your new boots fitted without the need for realignment.
- Jack up the front of the car and position two jack stands under the chassis.
- Center the steering wheel in the dead ahead position.
- Place a strip of masking tape on the front of each tire’s tread. Mark each piece of tape and measure exactly between the marks. Write down the measurement.
- Remove one wheel.
- Loosen the tie rod lock nut.
- Remove the nut holding the tie rod end to the steering arm.
- Use a tie rod end separator or a "tuning fork" ( aka. "pickle fork") to separate the tie rod end from the steering arm. If using a "tuning fork", try not to rip the rubber boot nor scar the steering arm. Alternatively, hold a heavy (2 - 3 lb.) hammer or similar hard heavy object against one side of the "ring" end of the steering arm where the tie rod end is mounted, and sharply strike the opposite side with a lighter hammer. The tie rod end should then pop out of its tapered seat in the steering arm. (Tie rod end service tools are available at most automotive parts suppliers and tool suppliers.)
- Unscrew the tie rod end, noting exactly how many turns it takes to get it off, then unscrew the lock nut. (An error of less than 1/2 turn will upset the alignment.)
- Undo the clamps on the old boot, remove the boot.
- Clean off all the dirt and old oil or grease.
- Install the new boot; don’t tighten the small clamp yet.
- Replace the lock nut on the tie rod, then screw the tie rod end back the number of turns it took to get it off.
- Reassemble the tie rod end to the steering arm.
- Replace the wheel.
- Check that the steering wheel is still centered exactly as it was when you started.
- Measure between the tape marks. Adjust the tie rod in or out of the end until the measurement is exactly what you started with.
- Tighten the tie rod lock nut, then the small boot clamp.
- Repeat for the other side.
- Fill the steering rack with SAE 90 gear oil, as per your shop manual. Using grease will not do! (Replacement racks are pre-lubricated, cannot be re-lubricated.)
EDITOR’S NOTE: Article originally posted in Moss Motors MG Catalog. Reprinted with permission.

|