The MGA With An Attitude
TAPPING PLATE, Door Buffer, MGA -- BD-210
I have been struggling on and off for decades with a bad part I had been buying from Moss Motors, USA, demonstrating that sometimes cheap is not such a good deal. The first problem is that this part has been made in aluminum. In use there is a serious issue with galvanic corrosion that effectively welds the steel screw in place so it cannot be disassemble just a few years later. Even anti-seize compound cannot stop the galvanic corrosion. To remove the duff part you have to first tear apart and destroy the rubber door buffer(s), then grind the head off of the screw(s) to remove the shut face panel. Then there is more grinding to shorten the remaining stub end of the screw that is accessible in front to be near flush with the tapping plate. Follow this with some possible deformation of the retaining slot in the door post to use a narrow hacksaw blade to cut off the back end of the screw before the part can be extracted from the door post. Failing that, there may follow some significant cut and weld to repair the cage bracket inside the door post, followed by cleanup and repainting. This is entirely inexcusable, being non-functional in the real world.
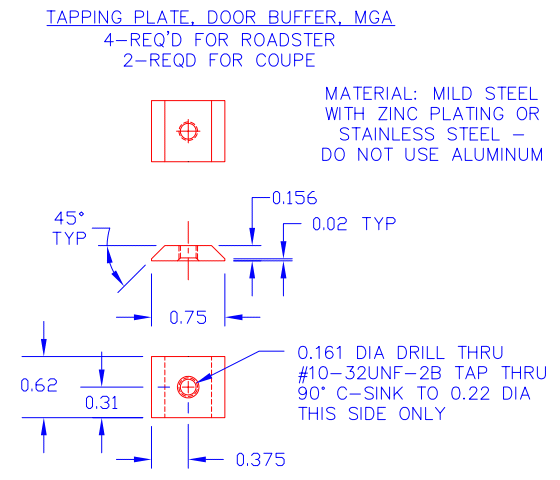
The second problem is that the tapped hole has small machining burrs at both ends of the thread, no chamfer and no deburring. This makes it nearly impossible to install the screw when the tapping plate is slightly misaligned, hidden inside the rubber buffer which is hidden inside the door post which is hidden behind the shut face panel. The tapped hole absolutely MUST have a small lead-in chamfer to help get the screw started. I have dropped a couple of these parts irretrievably inside the door post when struggling to install the screw. Regardless of the number of times I have told Moss about the bad parts and how to make them better, they have continued to supply the same bad bits for decades. Problems using these pieces have been so overwhelming that I finally resorted to making my own parts.

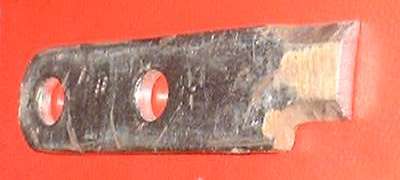
Above is a drawing of the part with all necessary information to manufacture it. This part is simple enough that most people could fabricate it at home if necessary. Below is a picture of a piece of bar stock in process, starting life as an old alternator bracket that was originally 3/16-inch thick, 1-inch wide, and chrome plated. I began using a pedestal grinder to grind one side to thin the part down to 5/32-inch thick. Then I ground one edge to narrow the part to 3/4-inch wide (hack saw might save some grinding time there). These steps could be avoided if I had in hand the correct size bar stock. This was followed by grinding the 45-degree bevel on two sides, leaving a few inches of the bar with the correct cross section. The pieces can then be cut to length and the drilled and tapped and chamfered holes added (not necessarily in that order).

Absolutely do not use aluminum for this part. Make it from stainless steel or mild steel (preferably zinc or nickel plated). Use anti-seize compound on the screw threads during assembly.
|