The MGA With An Attitude
Mounting the FRONT BUMPER, MGA -- BP-103
Installing the MGA front bumper is more of a challenge than the rear one. It is tucked in close to the body and just below the front edge of the body face cowling. Shape and alignment of the bumper is important, but the mounting brackets my not always want to cooperate.

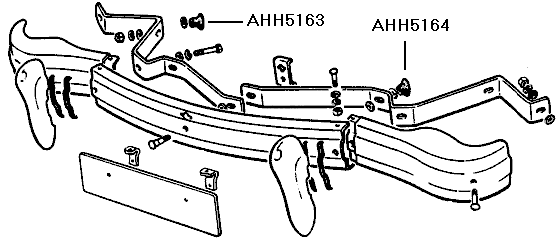
The bumper is mounted on flat spring steel brackets with dogleg bends. These brackets allow the bumper mount to flex a bit. If it encounters a mild and very low speed impact. like a very careful "park by ear", or a gentle push start by another car, the brackets can flex rather than bending the bumper face bar. This works especially well if the impact or push is directly on the overrider rather than on the face bar. An intentional gentle nudge by another car is intended to be taken on the overrider, with little or no touch on the face bar, in which case the face bar serves to stiffen and stabilize the overriders to keep them from twisting. End result is that a gentle nudge will wiggle the bumper but do no structural damage. This is best served if the bumper is mounted a little way away from the body so it doesn't chip the paint when it wiggles.
In the case that there is a mismatch in bumper height (vs. a larger car), such an impact will often occur at the top end of the overrider. This can twist the spring mount (not so much the face bar) allowing the top edge of the overrider to come into contact with the painted part of the body nose. The top of the overrider will then put a small crescent shaped impression in the sheet metal, but with luck no other damage, and it may not be to hard to repair. This is not by intention, but just works out that way in the environment of mismatched bumpers. If you leave the overriders off you are much more likely to incur damage to the face bar or body nose and grille.
For best appearance you want the bumper to be straight and level, close up under the body nose but not touching the body. For best protection you want the bumper to be spaced farther forward from the body, but not so far out as to make the bolts securing the front valance panel obviously visible from the top. If you install a fog lamp bracket the bumper may need to be a tad lower to allow the lamp bracket top securing bolt to pass under the body nose.
It is common that the front bumper and/or mounting brackets may have been bent by some prior impact. If you have a straight bumper, but it doesn't line up right relative to the body nose, then the main spring brackets may have the wrong shape. Condition of the front frame extension also bears checking. This should be symmetrical left to right, which can be verified by measuring diagonally.
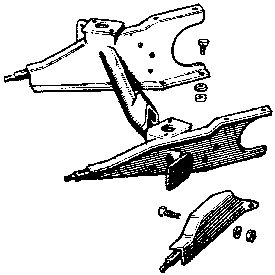
 The small frame side brackets extending forward to hold the outer bumper mounting studs also need to be straight. In particular, the side plate of this bracket needs to be completely flat except for the small tab for the rear bolt. If this bracket is kinked the outer end of the bumper may sit too close to the body. When the bracket is straight it can serve as a check template to assure that the tube flange it attaches to is also in the correct position. The outer end of this lateral tube sometimes gets pushed backward a bit with a frontal impact near the end of the bumper. Also if someone had once towed the car by pulling on the cross tube, the tube could be bent forward in the middle which can leave the outer end flanges dislocated slightly rearward.
If you will attempt to straighten or reform the main spring brackets, do NOT heat them with a torch. These parts are heat treated for spring toughness, similar to suspension springs. Heating the part will cause it to lose its spring temper, resulting in great loss of strength and very little spring back. If you want to remove the spring temper (annealing) to make the part easy to bend, heat the part to dull red, then bury it in dry sand to cool very slowly. If the spring temper needs to be restored, the entire part must be heated to dull red, then quenched in an oil bath. Do NOT quench it with water, as it will cool too fast, making it brittle and causing stress cracks. Allowing it to air cool slowly would result in too slow cooling rate which will not give it proper spring temper. Unless you are prepared to deal with these heat treating procedures, it is better to bend or re-bend the spring straps while leaving them in the original spring tempered condition.
Since these heavy spring brackets are tough and springy they are very difficult to bend by hand, and may be equally difficult to re-form while attached to the car. The way to do this is to clamp the part in a heavy bench vice, then get some leverage on it with a large adjustable wrench (or some creative special tools). Keep the tools close to the bends so you don't put curves in the straight sections. Then you get to make muscles like Popeye The Sailor Man while bending the part far enough to take a permanent set before allowing it spring back to a new rest position. If all this sounds like way too much work, it is, and it can be much easier just to buy new spring brackets.
For final installation it is easiest to put the entire front bumper assembly together loosely on the workbench, then offer it up to the frame extension studs, install the frame side brackets, and finally tighten all the fasteners while holding the parts in the desired final alignment position. This is of course easier said than done, and it may be helpful to have some moral support and an extra pair of hands. This figures to be a two six-pack job on a good day, so don't rush it. Patience pays here, as correct alignment of the front bumper is a very important appearance item for the MGA.
|