Chicagoland MG Club

Back to Archives
Submit an article
Cover
Intro & Club Officers
The Steering Column
The Passenger Seat
September Meeting Rept
October Meeting Report
Welcome New Members
Notice: Nominations
Collision Repair Tech
"Maynard's Surprise"
Fall Color Tour, Part 1
Fall Color Tour, Part 2
Emissions Tuning Tech
Halloween Rally, Part 1
Halloween Rally, Part 2
Fall Tune Down Party
Cruise To The Rock
Regalia Items Available
Regalia Order Form
CMGC Holiday Party
Bob & Don's Adventure
Fall Tune Down Prep
Winter Storage
Web Site Map
Tuning For Speed
What's New Now?
Classifieds
CMGC Events
Other Events
Back Cover
|
|

Fall Tune Down Preparation
From the tech pages of the CMGC web site
- - Author Unknown
This should be good reading before attending
the Fall Tune-Down Party
| Increase Your MG Blower Motor Power |
On many cold winter days, I have wished that the blower motor on my MG would run at a higher speed to keep up with the air being sucked out through the many cracks and crevices in the cockpit.
While replacing the fan, I noticed that the motor ran much faster being connected directly to the brown circuit at the fusebox. I decided to do some voltage and current measurements on the factory wiring harness and found that the original wires are of insufficient size to carry the necessary current to the fan motor. With the motor in operation, voltage fell from 12 volts to 9.7 volts and current was only 2.6 amps. Hooking the motor directly to the brown circuit at the fusebox and bypassing the smaller gauge wires resulted in a voltage drop of only one volt and a higher current supply to the motor of 3.5 amps.

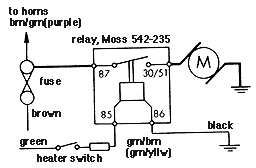
To remedy the problem of the slow running fan motor, I installed a relay in the fan motor circuit, and tapped voltage from the purple (fused) side of the fusebox. On the MGA, I used the same method, but tapped fan motor voltage from the brown/green (horn) side of the fusebox.
The relay, along with 12 gauge wire, supplies the motor with the current it needs, without the large voltage drop associated with the smaller wires, and greatly increases the amount of air delivered by the heater.
| Wrenching Fill and Drain Plugs |
Having trouble removing the differential oil plugs on your later MGB or Midget? Do your fill and drain plugs have holes for a square drive tool that you can’t seem to find when you need it?
Never fear, you can make the tool you need in a few minutes! You’ve probably noticed that it would appear that your socket wrench could work, but your 1/2" drive socket is too large and your 3/8" drive, too small. Therefore visit your local hardware store and buy the cheapest 3/8" socket to 1/2" drive converter you can find. For once in your life the soft metal on the cheap part will work in your favor, so enjoy the moment!
The hole in the plug is tapered from about 1/2" at the outside to about 3/8" in the inside. Using a few quick touches on the grindstone, taper the four sides of the adapter so that it will sink into the hole. It doesn’t take much, trial fit as you go.
When the tool will fit into the hole, put it onto your 3/8" drive socket and you have more than enough comfortable leverage to wrench out those fill and drain plugs.
I’ve had a problem with certain size spin-on oil filters. It seems my adjustable, one-size-fits-all wrench, just can’t get enough grip to spin the filters off sometimes. Now I use a strip of old inner tube about 8" long and 3" wide to wrap around the filters before I apply the wrench. This has always worked on even the most stubborn filters.
Poor acceleration and "sputtering" during acceleration may be due to a low oil level in the carburetor dashpots. Automatic transmission fluid works well in some carbs, but not in others. The old recommendation of "the same oil as used in the engine" is a good place to start. If this gives too lean a mixture on acceleration, try a slightly heavier oil; if too rich, then a lighter oil is indicated. Fill to within 1/4" of the top of the hollow air piston rod. Do not overfill!
Do you ever have flattened or bent-out-of-shape windshield wiper blades after storing your car for a long period of time? These are a thing of the past if you make a support for the blades.
A block of wood, about 1" x 1" x 1" with a slot cut halfway through will keep the rubber part of the blade from touching the windshield. The slot need only be the width of a table saw blade. The top of the block will bear on the wiper arm, the bottom on the glass with the rubber blade hanging free in the slot.
The hood release cable on my ’75 MGB has always been a source of lurking mistrust, ever since purchasing the car "used" several years ago. If the cable should break at the release mechanism or become otherwise disabled (i.e., my kind of luck), it would be necessary to cut the grille-screen or other adjacent panel to gain access to the release lever actuated by the cable.

An easy solution to this potential "nightmare" dilemma is provided by a common plastic wire-tie.
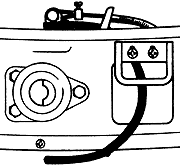
Install a heavy duty 14 in. length wire-tie as follows (see diagram)
Form the loop end around the under-hood release lever tip as shown.
Route the remaining wire-tie length over the top of the cable sheath and through the panel hole used for hood safety catch. (route must provide smooth pull-action for "tie".)
Tuck the tail of the tie in position along the grille-screen so that it can be easily accessed by reaching through the cut-out in the rubber bumper (right hand side facing car)
Your emergency hood release is ready if needed!
| Keeping Your Rear Convertible Window Clean |
Seeing through the rear window on your British roadster begins to get problematic as the plastic gradually goes from transparent, to translucent, to opaque. There are some exotic remedies offered for sale but I have found that good old auto wax keeps them sparkling and clear. I just do my rear window inside and out whenever I wax the car and it protects the plastic from the elements. The mild abrasive even seems to remove the film that may build up if you’ve waited too long between wax jobs. Just be sure that you start with a clean window so as not to grind dirt or grit into to your window.
Now review "Winter Storage" on the following pages, and start making
a list of things to do at the Fall Tune-Down Party on November 10.
|
|


